Tag Archives: Vintage

Halloween: Vintage Style

IMG_5691_editWell hi there, friends!

I come to you today with a fabulously exciting collaboration between the prolific milliner Tanith Rowan and I.  I stumbled upon Tanith’s blog in late July and became enamored with her monthly Whimsy project and stunning handmade hats. She announced in her newsletter an idea for creating a set of vintage-inspired Halloween costumes and I jumped at the chance to be a part of it. We exchanged general ideas and set about sketching in the beginning of August. In all, we both came up with 10-12 individual designs and then we narrowed down to 3 for production. And that narrowing was no easy feat. I would happily make every one of Tanith’s designs. Oh and her fashion sketching? Puts mine to shame, folks.

Tiny sidenote – as you look at these, bear in mind the fact that the garments were all sewn in a 32 square foot space. On my kitchen table. If you think you can’t sew because you don’t have room – don’t let it stop you. It can be annoying, but it’s possible and remarkable fun.

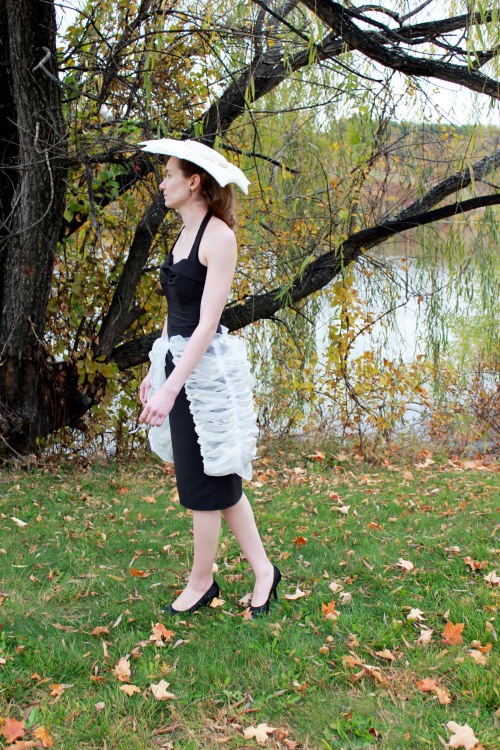
1950’s Spider
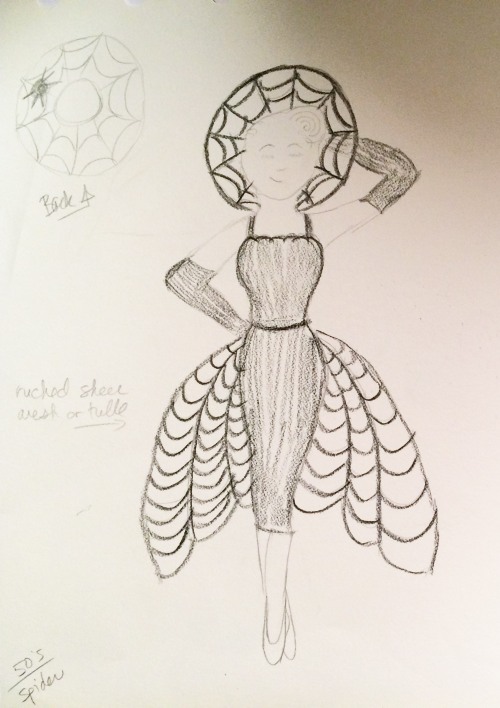
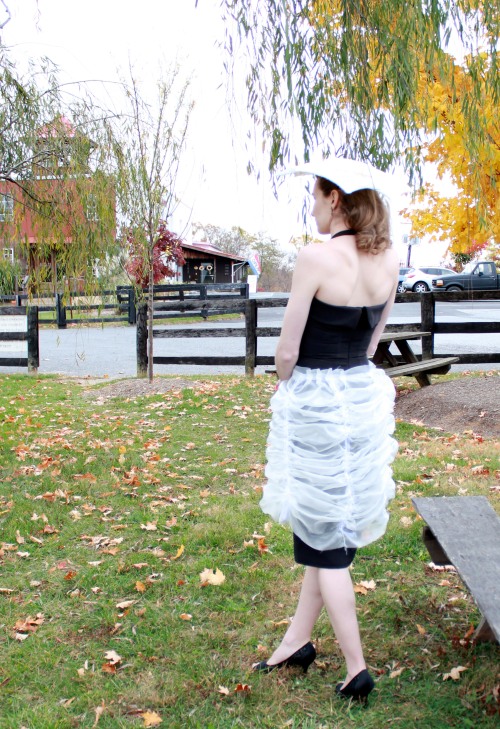
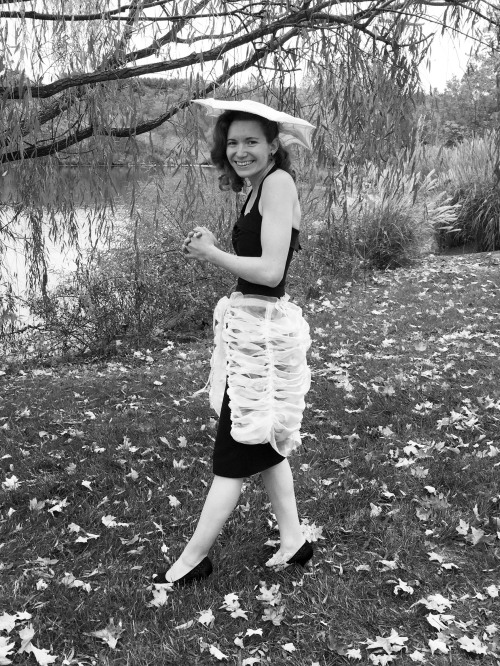
spidersketchFirst up – a 50’s sheath dress and gathered overskirt with a wide brimmed sun hat. Tanith’s take on the hat is a stroke of genius. Inside the brim, she hand cut felt spiders and hid them between the sheer layers, so they are only visible when the light shines through the brim in the right way.
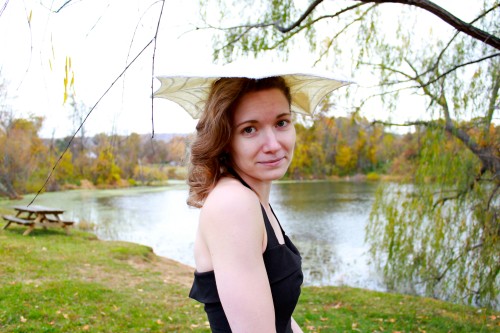
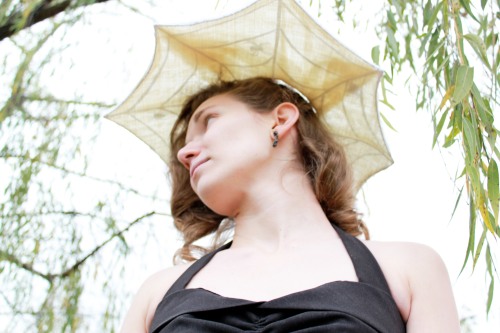
IMG_0965 IMG_0984For the dress, I used Gertie’s Tiki Dress pattern from her book and made it up in dark grey bengaline. I didn’t gather the skirt as she instructs, though.  I just used the simple pencil skirt instead. Of all the pieces for this project, I expected to have the most trouble and be the most frustrated by this one, just because of the complex nature of the construction and it being my first time using boning in a garment. It went together smoothly, to my great surprise. I even lined it! The “web” overskirt is self-drafted and made of creamy sheer. It’s loosely gathered using a technique I used last year to make an Anthropologie inspired duvet cover.
IMG_0976 IMG_09681930’s Cat

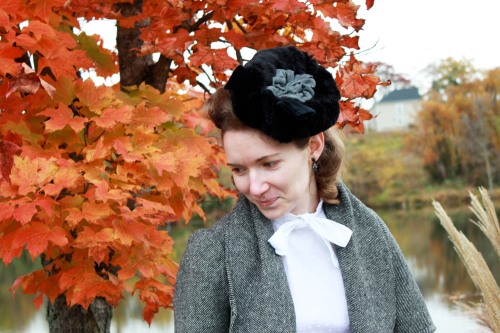
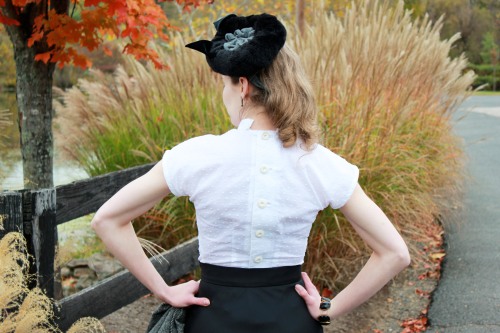
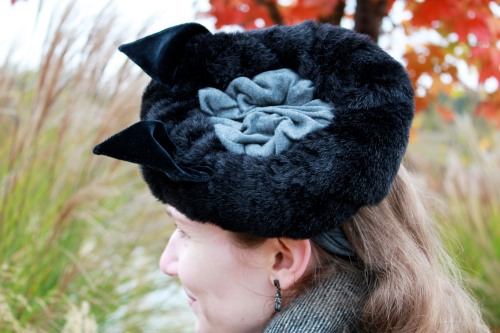
catsketchNext, a 30’s day outfit with a long skirt, bow-tied blouse and short cropped jacket. Tanith’s hat is a crown of fur with a knit fabric carefully gathered across the center and two velvet ears on the edge. By the way – a note about Tanith’s remarkable hat designs: she knows what a hat needs to help it stay on all day. For this hat, she built in a plaited bandeau that wraps around the back of your head to keep it in place. My hair mostly covers it in these photos, but trust me, it’s there.
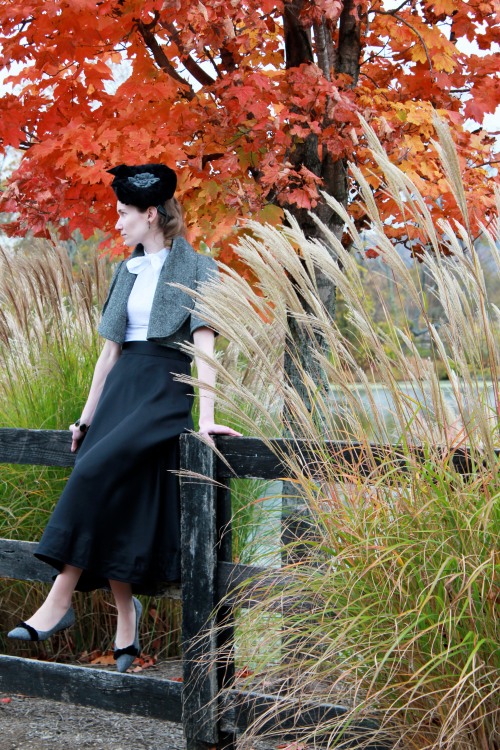
IMG_1014The skirt here is Wearing History’s 1930’s Bias Skirt pattern. I tried the print at home version and have never been so impressed with a print at home pattern. Lauren took great pains to make the matching of the pieces easy and she succeeded. If you were on the fence about trying any of her patterns, I highly recommend them (and no, she did not ask nor pay me to say it).

The blouse is Gertie’s Bow Tied Blouse (from the book above) made in cotton dotted Swiss. For some reason, this one item was the hardest and most frustrating to complete. I wish the pattern pieces from the New Book for Better Sewing were numbered or lettered somehow because I spent a whole hour convinced I did not have the pattern piece for the collar. It’s called a Collar Band in the pattern and it confused the heck out of me. The directions for sewing are a bit vague, too. If you are not an experienced sewer, they will be hard to follow. Anyway – the back is closed with 5 bound buttonholes and finished with vintage buttons. Gertie’s bound buttonhole instructions are my favorite bar none. If you are looking to attempt them, check out her tutorial in this book. In the end, I’m quite pleased with the result and will be making the blouse again.

The jacket is self-drafted with a big wide collar to give a proper backdrop for the bow on the blouse. The jacket fabric is vintage gray wool a friend gave me and it was perfect for this use. It’s been waiting on my fabric shelf for just such a project.

Of the three outfits, this is my favorite. And as Tanith said in her post, I love them all!
IMG_1027 IMG_1026 IMG_10421940’s Bat

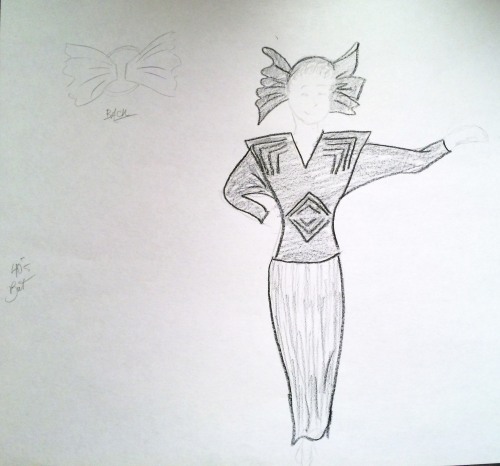
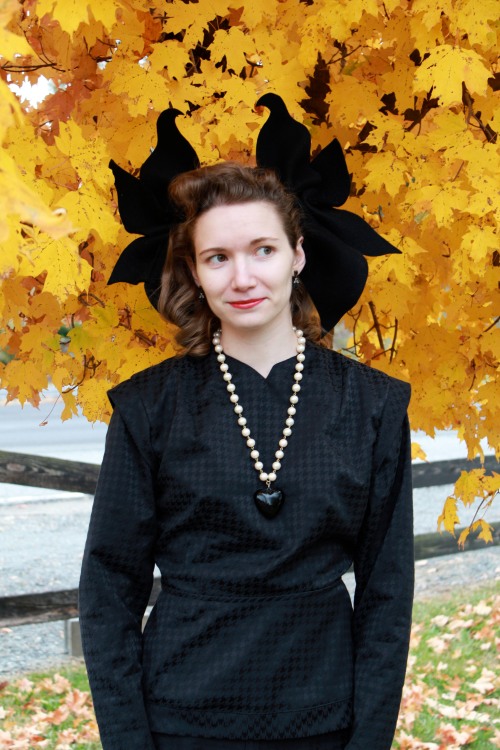
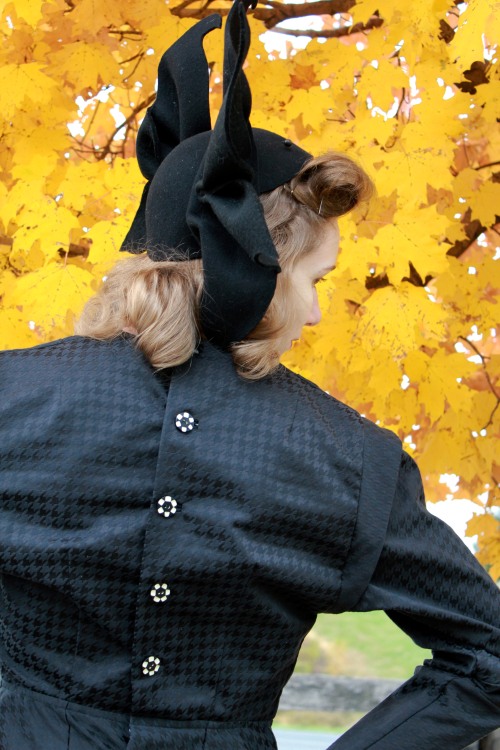
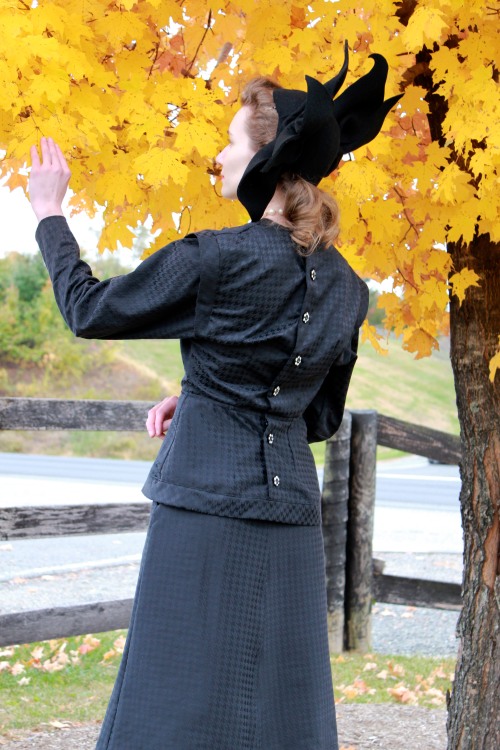
batsketchThe final outfit is a 40’s batwing suit made of houndstooth brocade. Tanith’s beautiful rendition of this hat blew me away from the moment I unpacked it. It’s another example of her thoughtful practical-ness, too. Inside, there are two elastic loops you bobby-pin to secure it.
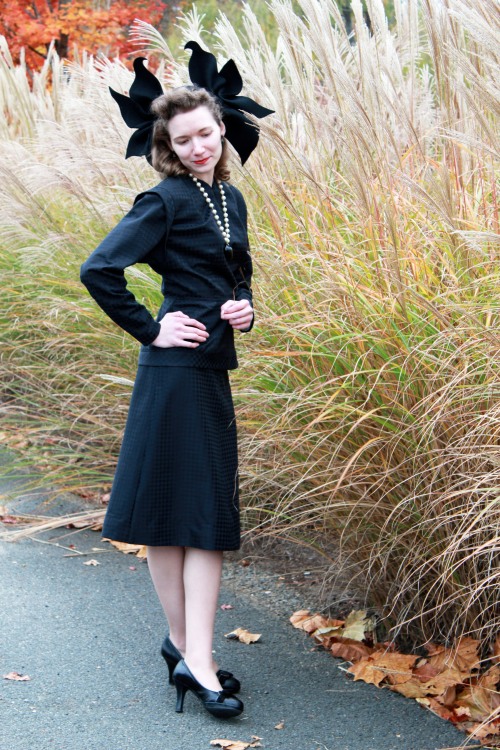
IMG_1090I initially intended to add directional quilting as you can see from the sketch, but when I found the houndstooth fabric, the quilting seemed like it would interfere. This design also has a back closure and no, the back closure theme was not intentional. The lines of both designs just seemed to fit with what we were going for. The pattern used for this outfit is Simplicity 1706 from the 40s. The buttons are another set of vintage beauties waiting for the right project to come along.
IMG_1059 IMG_1054 IMG_1046I am so honored to have worked with Tanith on this endeavor. She is a lovely person full of ingenuity, talent and brilliance. Make sure you go check out her post on this project over at her blog and while you’re at it, look at her Whimsy project, too!

Also, I’d like to extend my sincere gratitude to my dear friend Mrs. T who kindly dropped everything to take off on a photoshoot adventure with me at a moment’s notice. She snapped all the photos here and did a truly wonderful job. I love you, dearie.

5 Comments

Filed under Sewing

Posh Frock Friday on Sunday

It’s been a hectic week, so I’m Posh Frock Friday-ing here on Sunday, instead. My outfit is inspired by 40s war-working women. You may think I’ve gone all exotic on you, but actually the turban is a stylish hiding place for my pincurls.

Dress – handmade by me! You may remember this post asking for guidance on fabric choices?

Turban – scarf from Walmart. Tying instructions here.

Shoes – Newport News. These are my Carmen Miranda shoes – 4 inch heels!

6 Comments

Filed under Posh Frock Friday

Advance 2973: Part 2 – Prepare the Pattern

How to Sew: Part 1

Before I begin, I’d like to extend my sincere thanks to everyone who chimed in with opinions and suggestions for my new yellow dress.  The discussion was quite lively, with tons of amazing ideas tossed around.  In the end, I’m going for the plain yellow dress with no other colors sewn on.  Then, when I wear it I can accessorize with red, blue, green, black, white, brown, purple and even orange if I wanted to.  In the long run, it’s probably the best way to get the most wear out of the dress.

Today I’m going to share about how I begin working with a vintage pattern.  In my case, Advance 2973 from the 1940s.  Vintage patterns are quite fragile, so instead of using the original pattern pieces that come in the envelope to pin to the fabric, I like to trace them all out onto brand new tracing paper before I begin.  I only make a working copy of the pattern when working with vintage.  For the brand new patterns you can buy in the fabric store, I cut right into them and use them as is.

First, you’ll need to gather your supplies.

– 1 roll of regular tracing paper (I got mine from here, but I’ve seen it in my local Hobby Lobby in the drafting section) Wax paper, packing paper and butcher paper will all work fine, too.

-1 reliable pencil (I like mechanical)

-1 fine tipped permanent pen (I used a Sharpie pen)

-1 regular clean iron (I say clean because you don’t want any yucky burned stuff coming off onto the pattern when you iron it.)

-1 pair of paper scissors (see note below*)

-1 vintage pattern

an assortment of household items to use as weights while tracing (candles and small cans of food would be good, but you can use whatever you have – you just don’t want it to be too bulky that you can’t get your arms around it to trace)

-1 large plastic zip-top bag

{Step 1}


Take all the pieces from the envelope very carefully.  The paper is fragile and tears easily.  Unfold each piece, one at a time and smooth them out with your hand. (Make sure you don’t have any lotion on your hands.) Make a little pile of your smoothed pieces.

{Step 2}


Turn on your iron to its lowest setting – the coolest it can be while still being on.  On my iron, that is the “synthetic” setting.

{Step 3}

When the iron is ready, take your first smoothed pattern piece and gently but quickly glide the iron over it to smooth out the wrinkles.  [Disclaimer: I’m sure some sewers are going to be horrified at the idea of ironing vintage pattern pieces to smooth them out, since heat is so well know to be a killer for vintage items.  I can’t come up with any other way to make the pattern usable.  If you have a better way, please share it.  I’m always open to suggestions.] Continue using the iron to smooth all the rest of the pieces, taking care not to catch the iron on any marking perforations in the paper.
{Step 4}


Lay out all your ironed pieces and compare them to the pattern instructions to see if they are all present and accounted for.  This is very important, because vintage patterns often have pieces missing.  If you find your pattern is missing a piece, it’s not the end of the world.  Sewing forums or blogs like Sew Retro are great places for connecting with other sewers who may have the same pattern as you and would be willing to trace your missing piece and send it to you.

{Step 5}

Get acquainted with your pattern pieces.  On my pattern, all the information is marked with perforations made in the paper.  The letter of the pattern, signifying which piece it is, is marked with a dotted letter.  Small circles and notches are used as matching points, so you know how to match up the different pieces.  Most of the early patterns (1930s-1960s, I think) were marked with perforations.  The idea of printing on the patterns didn’t take hold until the mid 60’s, I believe.

{Step 6}


Time to trace.  Roll out your tracing paper on a large flat surface.  You’ll want a good amount of room, but this can be done in a smaller area. Lay your pattern pieces out on the paper, rotating them to make as many fit as possible and set your weights on top of them. When laying out the pieces, make sure you notice where the notches are – these look like little triangles cut into the side of the paper. When you have the pieces arranged the way you want, start tracing around them with your pencil.  Trace the outline, the inside of the perforations and draw out your notches.  Make sure you look over the pattern carefully to be sure you have found all the marking perforations.  It’s easy to miss them sometimes.  Many patterns, like my Advance, have all the perforations and notches labeled on the instruction sheet.  Compare your tracing to that to double check.  Trace each piece individually out onto the paper.

{Step 7}


Before we continue with the new traced pieces, let’s preserve the vintage pieces and keep them safe.  Here’s where you’ll need your zip-top bag. Fold each pattern piece back up into a manageable size. Gather the folded pieces, together with the pattern envelope and slip them into your plastic bag.  At the end of this project, when you are done with the instructions, they will also be stored in this bag.  The bag will help to keep the pieces from being lost, and also provide some protection for the yellowing paper.

{Step 8}


Now that you have all the pieces traced in pencil, get out your fine tipped permanent pen and go over all the perforation markings and the pattern letter.  These are the most important pieces of information on the pattern, and you don’t want them to get smudged or rubbed out. It’s not necessary to mark over the outline in permanent pen, since it is only a cutting line.

{Step 9}


Break out those paper scissors now and cut the new traced pieces out of the background.

{Step 10}


One last step: look at the cutting layouts on the pattern instruction sheet.  On a vintage pattern, this is the only way you are going to be able to figure out how many of each piece to cut.  On modern patterns, this information will already be printed on the pattern piece.  You’re going to see rectangle boxes with all the pattern pieces laid out on them.  The rectangle represents a yardage of fabric as you would buy it in the fabric store.  It is a huge piece that has been folded in half to create this slender rectangle.  On the instruction sheet, one long side of the fabric is marked with the word FOLD.  On the other, you’ll see the word SELVAGES.  The selvages are factory finished edges of the fabric.  On my cutting instructions you can see that we have 5 pattern pieces that need to be cut on the fold.  The fold is marked on each piece with two large dots in a vertical line.  Usually, when a pattern piece is cut on the fold, you only need one.  Pieces cut on the fold are mostly back and collar pieces, since they are symmetrical.  From the cutting instructions, we can ascertain that for Advance 2973, we will need:

2 of A

1 of B (on fold)

1 of C (on fold)

1 of D (on fold)

2 of E

2 of F

1 of G (on fold)

2 of H

4 of J

1 of K (on fold)

2 of L

2 of N

Go back to each of your traced pattern pieces now and mark the number of fabric pieces you ‘ll need for each and whether or not it is cut on the fold.  This will help you immensely when you are ready to cut the fabric.

Armed with your new set of pattern pieces, you are now ready to begin your sewing endeavor!  Up next, Outfitting Your Sewing Kit.

As always, if you have a comment, suggestion,  see something I said that is wrong, or have trouble understanding a step, leave me a note and tell me about it.  I’m a big believer in feedback!

*In the sewing world, there are 2 kinds of scissors – fabric and paper.  Each is kept separate from the other and used for their specific purpose only. They aren’t special scissors you can buy and before they are used they are exactly the same.  The difference comes with use. Paper dulls the blades faster than fabric, so you never want to cut paper with your fabric scissors.

Leave a comment

Filed under How to Sew, Sewing

Anniversary Giveaway!

(trumpet fanfare, please)

…Announcing the first ever Noir Girl giveaway…

…in honor of my 100 Day Anniversary!

Noir Girl has now been in existence for almost 100 days, all thanks to the many marvelous readers who frequent this blog.  I am so grateful to each and every one of you for all your kindness, camaraderie and friendship.  I truly enjoy reading and commenting on all your posts.  You inspire me, challenge my thinking and back up my gut reactions.  In a sentence: You guys are wonderful!  It’s so exciting to be a part of the blog community. So, I’ve been plotting how I could say thank you in a more tangible way, and I think I have a pretty good offer.

I made 5 handkerchief sachets that I am going to give away to five lucky readers in the coming weeks.

Fabrics (from left to right): Brown Tooled Suede, Indian Inspired Multicolored Brocade with Gold Overtones, Cream Cotton Calico with Yellow Flowers, Pink Floral Silk Charmeuse, Green Silk Brocade

Lining Fabrics (from left to right): Pink Crinkled Satin, Deep Purple Crinkled Satin, Gold Silk Brocade, Pink Taffeta, Green Silk Brocade

The fabrics for each one are listed above and they all have satin ribbon ties. The Pink Silk Charmeuse sachet is lined with the same pink taffeta from the Vogue Jacket project.  The rest are all fabrics from my stash.

If you’ve never heard of Handkerchief Sachets before, they are small fabric pockets usually made out of luxury fabrics used for keeping a lady’s delicate handkerchiefs safe.  I believe that some may have had lavender and other sweet smelling items hidden somewhere inside to freshen the hankies.  I have a vintage one that lives on my vanity (that’s my vanity above).  The allure for me about handkerchief sachets is the fact that many young women used theirs as hiding places for secret treasures.  I became fascinated with them after watching At Bertram’s Hotel (1987) with Joan Hickson as Miss Marple.  In this made for tv film, there is a scene where Miss Marple is showing her friend some recent purchases:

Miss Marple: Oh, and I also treated myself to a handkerchief sachet.

Lady Selina: Oh, how pretty!

MM: My old one had fallen to bits.  I’d had it ever since I was a girl.

LS: Oh the things I used to hide in my handkerchief sachet! Photographs, love letters, diaries…

MM: Oh, yes!  I once kept a valentine card in mine – for years.  Given me by a young man called Lionel Mattingly.

LS: Romance, Jane? What happened?

MM: Oh, nothing. Mother nipped it in the bud.

LS: You mean you never saw him again?

MM: Oh, indeed yes.  I came across him years later. And of course, Mother was absolutely right.

This can kind of give you an idea, anyway of the feeling I’m trying to tap into with my own versions of the Handkerchief Sachet.

On to the nitty gritty:  This is an open invitation for everyone to participate (International friends included! – don’t worry about the postage).  Feel free to enter if you’ve never commented before, whether you know me or not, or if you just found my blog today.  I want to hear from you!

How to win: Comment on this post and be sure to fill in an email address in the form, so I can contact you when you win. And, specify which sachet you like the best, and I’ll try to give you the one you like.

For the comments, let’s play a little game.  Let’s see if we can write a story, with each comment adding two or three words.  The first words are:

The cool breeze

Take it anywhere you want to go, but let’s refrain from profanities and objectionable content.  Keep it clean.  I’d love to get 100 words – one for each day my blog has been up. When I announce the winners, I’ll post the finished story and we’ll see how we did. :)

I will draw the winners from a vintage hat on April 1, 2009. On that day, I’ll do a post announcing the winners and email each one.

Good luck, my dears!

22 Comments

Filed under Giveaway, Sewing

Headbands and Sachet Set

I got my little headbands all finished!  It was touch and go there for a while.  I though maybe I wouldn’t finish them in time for the event where I was going to see my 5-year-old friend.  It all worked out, though.  :)  Have a look at the finished product.

I fashioned a “headband sachet” (a play on handkerchief sachet) out of the pink bandanna fabric and the remainder of the pink taffeta from the Vogue jacket.  I have a handkerchief sachet that is this same size and it served as my model.  My version has satin ribbon ties and an iron on embroidery initial.  I also used fusible fleece on the wrong side of the bandanna fabric to give the sachet more body.  It worked out well and has a great aesthetic feel when you hold it.

I treated the edges of the ribbon with Fray Check, because there is absolutely nothing worse than frayed edges on ribbon.  It’s one of my sewing pet peeves.  I just think it ruins the whole look of the piece.  I feel that if, as a sewer, you’re going to go to the trouble of making something lovely, it should be as professional and finished looking as possible.

The inside of the sachet – It has two pockets for keeping headbands and other treasures.  I’ve heard that some ladies used their sachets as hiding places for love letters and other sentimental items.  I think that’s a lovely idea.

If you’d like to make headbands of your own, have a look at Heather Bailey’s instructions.

Happy Sunday, my dears!

5 Comments

Filed under Crafty, Sewing

Inspiration Board

I’ve got so many ideas swirling around in my head right now.  It’s getting hard to think of anything else, so I figured I’d share them with all of you.  Then, maybe I’ll be able to put them to rest until I can complete them.

First up – two vintage patterns I recently acquired that I’m terribly excited about.

The Advance 2973 dress pattern is a style that I’ve been dreaming about making.  The long lines are great for trimming the figure and the lovely billowy sleeves are amazing.  I was thinking of doing my first version in soft pink.  What color/pattern would you choose?

The McCalls 2060 playsuit pattern is just for fun.  I wasn’t looking for a playsuit, but when I saw it I couldn’t resist.  When I make it up, I’ll lengthen the shorts some, because I like my shorts a little longer.  I’m not too crazy about the appliques, so I’ll probably go plain.  Wouldn’t it be cute in red gingham with a red belt and red sandals?  :)

The center Simplicity 6825 pattern was a lovely gift from the seller on Etsy.  It’s a lovely dress.  I always adore lace sleeves and insets.

Then, I’ve been investigating accessories for the Vogue suit.  I decided while I was making it that I wanted to do a matching hat, but I was undecided about which kind.  That’s when I came across Mary Beth’s post on her class to make fedoras.  I knew I’d found my perfect hat.  I’m going to use Vogue 8175, since (as Mary Beth says) it is a better pattern.

Then, for a purse I’m still undecided.  The pattern envelope of the suit (Vogue 2885) has a terribly intriguing purse on it, (look at the lady with the red jacket) but I’d have to draft the pattern for that one myself.  I can do it, and I’ve done it before, but I may not have time to conquer that one right now.  If I can find a pattern I like as much or better, I’ll make it instead.  (Suggestions welcome!)

Next, I got these lovely fabrics for a set of headbands I’m planning on gifting to a 5-year-old friend of mine. :)  I’ve made headbands from Heather Bailey’s pattern before and they are so cute and so simple (incidentally, if you’ve never seen her blog, it’s truly worth a look).

Finally, I’m finishing up a huge crochet stole that I made over Christmas out of the softest, dark green, chenille yarn.  I just have to sew the satin blanket binding around the edges to give it stability.  I made it from this vintage pattern and it worked up beautifully.

I’ve got other little ideas nagging at me, but these are “The Big Four.”  I’ll probably be tackling the headbands first, since those are for someone else.  After that, it’s the stole.  It won’t take much to finish that, so it’s an easy feeling of accomplishment.  :)

6 Comments

Filed under Crafty, Fashion Backward, Sewing

Vogue 2885 Jacket: Part 2

Coming to you, courtesy of a once-in-a-lifetime Homework Free Weekend:

The Vogue 2885 Jacket!

(I’m sorry about the strange lighting in these photos.  It was amazingly light when I was photographing and it washed out the color in some of them. :( )

Some of the making up instructions were a little odd, but I followed everything to the letter.  I figured that I can add my own spin the next time I make the pattern.

Let’s start with the sleeves:

Both the fashion fabric and the lining have these gathers at the inside elbow.  This is a design element I’ve never seen before.  It might be practical, since when I wear it the sleeve moves with my arm very well, or it could be purely for looks.  It’s a puzzlement.

Another puzzlement that was terribly frustrating was the fact that the lining sleeves were sewn on after the rest of the jacket had been put together.  That means by hand.  I usually use my machine to ease the sleeves into the arm holes, so sewing one on by hand was a little unthinkable.  I did it, though, I’m proud to say.  It took me forever, but I did it.  I’ll say this though – I’m not going to intentionally hand sew sleeves on ever again.  ;)

Then, the back pleat:

I love the way this turned out.  It’s one of those touches that just exemplifies the 40’s look.

And, one more look at the glorious pad-stitched collar in it’s final form:

My closure of choice:

Lovely leather buttons that are so smooth and nice.  I was considering covered buttons, but while digging around in my notions box for the forms, I saw these and knew they were perfect.  I bought them a while ago when I made my brown corduroy vest (before my bloggy days) as an option for closures, but decided on something else.  So, these beauties languished in the notions box until now.  They have happily found a home.  :)

Now- on to the pink taffeta lining:

I am totally hating these buttonholes (especially on the inside).  This is one of those quirky methods I referred to above.  I have done bound buttonholes several times before – but I’ve never seen a method as hard to accomplish as this.  The fronts were quite easy, but the inside parts involved cutting a slit above where the buttonhole was on the other side.  Then, turning the raw edge created by the slit under and slip stitching, exposing the buttonhole to the inside.  It was hard to keep smooth (you can see that it puckered a little) and it was a handful while I was trying to hand sew the opening shut.  Next time, no matter what the pattern says, I’m trying Paco’s method on buttonholes that I just found today via the amazing Tany.  I like to learn as many sewing methods as I can, so that’s why I didn’t want to just discard the pattern instructions.   However, it does burn me up a little that the method wasn’t as finished looking as the rest of the jacket.  Ugh!

On to happier adventures –  the bar tacks!

This was my first experience bar tacking and I truly enjoyed it.  (Yes, that’s my sadly red thumb with the polish down there.  My hands are all dry from the cold, so they won’t exactly be in any adverts any time soon!)  There are 10 bar tacks in the lining of this jacket and I got them done in about an hour.  They look so professional!  (Sorry for that stray little thread there – my zeal for sharing got the better of my perfectionist side!)

Back view – It has a terrific silhouette, don’t you think?  Now all I have to do is invent a special occasion so I can wear it!

Overall, I’m so happy and proud of it.  If you had told me back when I was a little girl sewing stuffed bears that I would one day be able to sew this, I wouldn’t have believed you.  Goes to show how far you can come.

I wish you all a lovely day, my friends!

23 Comments

Filed under Fashion Backward, Sewing

Vogue 2885 Jacket: Part 1

I’m not finished with it yet, but here’s a little sneak peek at my Vogue 2885 jacket.

Bound Buttonholes:

Pink Taffeta for Lining:

I’m hoping the taffeta will give my jacket more body because the suiting fabric I chose is stretchy and a little flimsy.

And…Pad-stitched Collar!

Pad-stitching was completely new to me when I saw it listed in the instructions.  I had to do an extensive internet search to get enough info to figure out what I was supposed to be doing.  I hope my research will be useful to others looking for guidance.  Be reassured, pad-stitching is not as hard as it looks or sounds.

1st source: Ann’s Fashion Studio – I found this post that was a goldmine of technique and provided the one I ended up using.  The idea is to draw a grid on the interfacing of your collar or facing and use it to direct the stitching.  I believe it was originated by Roberta Carr.  (I’m gonna have to find some those DVDs that Ann mentions in her post!)  I free handed a grid on my collar according to the Vogue pattern instructions.  I needed to have tighter stitching on the collar stand and wider stitching on the wings.  That meant smaller grid boxes on the stand portion and larger on the wings.  (The yellow basting on my collar is the divide between the collar stand and the wings.)

Then, I actually had to take up the needle and thread.  One of my most terrifying moments during the process of making this outfit.

2nd source: Vintage Sewing.info – This site helped me to form a mental picture of what my stitching should look like.  The idea is to have miniscule stitches on the right side of the fabric and large, supportive V stitches on the underside.  The concentration of stitching strengthens the fabric and gives it a body it wouldn’t ordinarily have.

3rd source: Couture et Tricot – Tany’s post on pad stitching was incredibly helpful for me to see how my collar was supposed to look.  Her example is almost exactly the same shape as mine, so it gave me a much better understanding of my goal.

4th source: Sewing Pattern Review.com – I found this discussion on a message board with a helpful tip from someone named Tom P about steam pressing the collar after you finish pad stitching.  I followed the advice, and my collar stands beautifully.

I encourage you to give pad stitching a try.  It’s very worthwhile for the strength of a collar and it gives you a great sense of accomplishment to know that you mastered a technique of the vintage dressmakers and tailors.  It gives your garment a true vintage feel.  I even found it relaxing to use the needle and hand sew the pad stitching.

Coming up… finished photos of the Vogue 2885 jacket!

6 Comments

Filed under Fashion Backward, Sewing

English Joy

This has been one hard, cold, tiring day.  Really. Here in the good ole Midwest, we are suffering with below zero temperatures (-6° F but feels like -20° F with the windchill.  That’s -21/-28° C).  We were warned on the news this morning that skin exposed to the cold air for 10(!) minutes would be subject to frostbite!

Then, I’ve spent my whole day working in one of my studio classes.  (It’s an all-day class.)  Needless to say, I was beat.

So, when I checked my mailbox and found a cardboard sleeve with a sticker that said “Royal Mail” on the corner, my heart skipped ten beats.  You have to understand that for a little American girl, a package from England is like the be all and end all.

Look at this logo. Talk about good graphic design!

I have been expecting this package for some time and I was beginning to give up hope of ever seeing it.  It is so fitting that it arrived today.

My English mystery package was an impressively fat, vintage knitting and crochet “Bible” that I purchased with the last of my Christmas money.  It’s called A Stitch In Time and was authored by Jane Waller and Susan Crawford.  I am terribly happy with how big it is.  It measures 8 1/4 in. by 11 3/4 in. and it’s nearly an inch thick!

Knit on the Net has a great logo too (click photo to see it)

I found out about this little gem because of the Diary of a Vintage Girl blog.  The lovely writer is a model, and she modeled many of the sweaters (or jumpers – I just love that word) for this re-creation book.  Here’s a link to her post about it, complete with buying instructions: Knitty Gritty

The book is gorgeous, honestly and truly.  It’s worth buying for the spectacular photography alone.  I knew the minute I saw it I was going to have to learn to knit (I’m a crocheter, but somehow the joys of knitting have always eluded me).  I was right.  The patterns for vintage sweaters are so exciting, I’m just dying to get out those knitting needles and try, try again.

Aside from the new photographs of the sweaters, bathing suits, gloves, purses, belts and lingerie, A Stitch In Time also has copies of the original vintage patterns before each new, revised pattern, with the original photographs.  It’s divided into 5 sections spanning the golden years of fashion: 1920-49.  At the beginning of every new section, the authors have a short essay about the fashion of each particular year span.

Look at this cute little card that was slipped between the pages of the book:

What a day-maker!

7 Comments

Filed under Fashion Backward, Sewing

Fashion Backward: Vogue 2885 Skirt

skirt-sweater-frontSkirt’s all done!

It’s pictured with one of my favorite sweaters.  I think it looks very 1940’s.

Here’s a closeup of this plaid fabric:

plaid-fabric

When I bought this fabric some 6 months ago, I wasn’t sure if I really liked it.  But, I have decided that it’s quite perfect for this skirt pattern.  I was worried about matching the plaid and terrified that if I didn’t match it just right, the skirt would end up looking clownish.  I think it worked well though.  I agonized long enough about it! ;)

waistbandOne of my most favorite design elements about this skirt is the notched waistband.  I thought it would be hard to get this to look right, and knew it was a spot of potential danger.  But, actually the instructions were wonderful and I had no trouble with it.

I did have some trouble with the zipper.  I’m not really sure why, either.  It was supposed to be covered with the lapped side of the skirt.  Somehow, mine is just in the side with no lapping.  The pattern did not call for an invisible zipper, so I didn’t use one, although now I’m wishing I had.  Ah, well – we live and learn.  It doesn’t look bad, it’s just a matching zipper.

skirt-backThe back has a deep pleat with an underlay.  It’s a nice vintage touch.

This skirt is a little longer than I usually wear them.  I like my skirts to be just above the knee and this one falls just below the knee.  I’ve decided to wear it a couple of times and see if I have feelings of absolute hatred for this longer length.  If I do, I can adjust the hem, but I hope I don’t.  I dislike hemming.

I’m cutting out the fabric for the jacket right now.  It’s a deep brown stretch suiting.  I have four days left of break, so it’s a race now!

My sincere thanks to everyone who expressed interest and wished me luck on this venture.  Your comments are greatly appreciated!

6 Comments

Filed under Fashion Backward, Sewing