Category Archives: Fashion Backward

Snood Perfection for the Unconvinced

If my dual tutorials (1, 2) have not been enough to convince you, my dear readers, of snood excellence, I present a final piece of imagery: the beautiful and talented Beth Riesgraf in the most recent episode of Leverage.

As Parker, Beth dons a gorgeous range of outfits – sweaters from Anthropologie, hats of all descriptions, blouses with peter pan collars and sometimes even fluffy feathered dresses, but the black lace snood and matching dress above are my favorites by far.

It also helps that Beth wore this outfit for perhaps the most “classic Parker” moment of this season:

ELIOT: Did you take a bite of all these?
PARKER: Well, I had to see which one I wanted.

**a big thank you to leverage-caps.tumblr.com and fishnightlight.tumblr.com for screencapping the episode so meticulously**

5 Comments

Filed under Fashion Backward

How to Tie a Snood with a Scarf

Let’s chat about snoods. I realize some of you may find the title of this post crazily repetitive, particularly if you hail from across the pond. But in the 40s sense of the word, a snood is a “a netlike hat or part of a hat or fabric that holds or covers the back of a woman’s hair.” It’s a casual alternative to pinning your hair up, as Ann Sheridan so beautifully demonstrates above. I’m fond of wearing snoods because they lend a 40s look in a quick, easy fashion and are great for days when your hair decides to strike. In my world, there are two types of snoods: special crocheted versions and scarves I tie myself. Today, I’d like to share the instructions for tying a regular 24″ square scarf into a snood.

You will need:

  • a square scarf that is at least large enough to tie completely around your head – something in the 24″ square range. If you can wear it as a babushka, it will work for this. Triangular scarves work just fine, too. In fact, the two lace snoods seen in my photos are actually triangles. Any material will work, but scarves with a sheer quality are more authentically snood-ish.
  • hair pins (I use bobby pins from Sally’s that match my hair color)

Step 1

Prepare your hair. Style the front with large pincurls, a little rabbit ridge or just pin it back. If you have bangs, you are all set. The back of your hair need not be brushed or straightened. In fact, this is a great style to tame freshly pincurled hair for a few hours.

Step 2

Fold your scarf diagonally, from corner to corner, creating a large triangle. Flip your hair forward while bending at the waist, so your hair falls over the top of your head. Tie the scarf around your head with the square knot just touching your forehead (so it will be over your front styled hair for now). Leave the scarf ends loose.

Step 3

Adjust the point of the scarf to become a pocket for your hair, tucking in loose pieces. Roll up the scarf from the point, corralling your back hair in the pocket created. Secure the top of the pocket with hairpins.

Step 4

Move the top knot behind your front hair, carefully untying it and retying it if necessary. To finish, take one of the loose scarf ends and tuck it into the side it falls closest to, securing with pins. Repeat for the other loose end. Tuck any flyaways and secure with more pins as needed.

If you are confused, have a look at my little gif:

If you have any questions or if something is unclear, do be sure and speak up! I’m happy to help. And keep an eye out for my next snoody post – next week I’ll be writing about crocheted snoods – how to make and wear them!

7 Comments

Filed under Fashion Backward, How to

Posh Frock Friday!

Today I’m playing along with Kate’s new event: Posh Frock Fridays. Here’s the idea: we all get dolled up in our prettiest duds (just because we can) and while we’re at it, we snap a photo to show. Behold, my entry!

Dress: sewn by me!

Cropped jacket: inherited from my grandmother

Faux-fur scarf: vintage from gwenevere24

Faux-fur hat: vintage from Sadie ‘n Stella

Shoes: Emily’s Closet

Bracelet and earrings: Burlington Coat Factory

Nailpolish: China Rouge from China Glaze

Advantageous mask: vintage travel stationery from a local antique shop

Fun fact about this outfit: This is what I wore when I presented my senior project to the faculty several weeks ago. It made the whole experience feel like a Noir adventure!

15 Comments

Filed under Fashion Backward, me

How to Tie a Turban Like Hedy

Much excitement today! I have a tribute post to Hedy Lamarr up on Silents and Talkies, complete with an eye-popping portrait of Hedy drawn by Kate herself! In honor of this momentous occasion, I’ve prepared a tutorial for all my dear readers. But first, a little explanation about my Hedy ardor.

Quite awhile ago, Kate asked her readers which star had sparked their interest in classic film. At the time, I couldn’t remember, so I didn’t participate in the discussion. (sorry, Kate – I really wanted to!) But, as I’ve been pondering the question, I’ve come to the realization that my hook into classic film was Hedy Lamarr. My premier Hedy Lamarr film was Lady of the Tropics (1939) with Robert Taylor. Hedy plays an exotic woman of European and Asian descent residing in the Orient. In one important scene, she wears a modest white turban accented with long earrings and a matching necklace. (See photos above)

The image of this uncommonly exquisite woman in her striking head wear made an enduring impression on me as a 12 year old. I seized a kerchief at the time and tried to tie a turban like hers, to no avail. While I moved on to other films and other stars as my fascination for classic film intensified, Hedy and her turban were unforgettable.

And then I saw Come Live With Me (1941). Come Live With Me is a typical 40’s feel good flick – boy meets girl, boy loses girl, boy and girl live happily ever after in the end. Of course there are some other twists, but that’s the major plot. It’s an enjoyable film and I’ve seen it several times. But there is one scene which makes this film a must see for any Hedy Lamarr fan: when Hedy demonstrates how to tie her turban. For me, finding this scene was like Hedy personally visiting me and teaching me how to recreate her iconic look.

I had forgotten about Hedy and her lovely turban… until I started experimenting with pin curls about a year ago. When you set your hair in pin curls and try to sleep in it, the pins can be dreadfully painful. I needed a head covering that would stay put and – voila! Hedy’s Turban Training came to the rescue! I even wear my turban to the store now (Walmart, no less!) and get treated like a duchess because of it. The cashiers in my local Walmart are ridiculously truculent, so this is a major victory. And I owe it all to Hedy…

On to the instructions! The title of Duchess of Walmart awaits you, my friends!

Doesn’t George look dashing? I think it quite suits him. :) You can find these instructions in my flickr set, if you want a better look at them. If you have any trouble with the tutorial, please let me know. Even if you just see a typo, please tell me! I want everyone to be able to recreate the Hedy look successfully. Happy Turban Tying!

***March 25, 2010 Update: This post was featured in the Queens of Vintage Turban post today! I’m so honored to be included in it.***


23 Comments

Filed under Fashion Backward, Film Bloggers, How to

The Noir Girl Uniform

The *Official* Noir Girl Uniform

Silhoutte

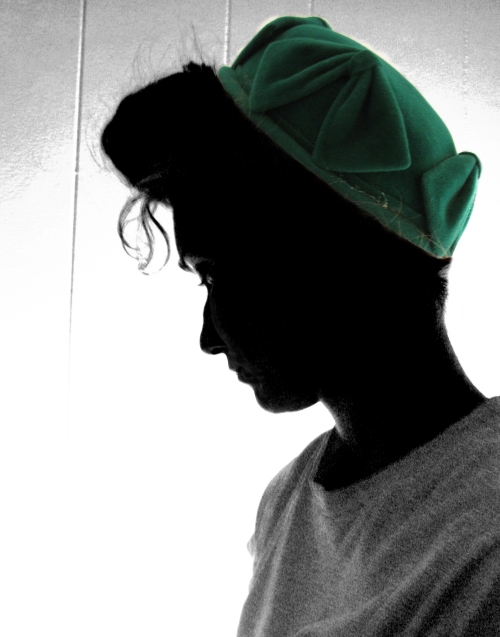
I wore an outfit very similar to this today at school. I created it just so I could wear the precious green wool hat from my avatar photo. It was terribly exciting garb to spend my day in, so much so I’ve decided to make it my official uniform. If I ever get to meet any of you lovely dears in person, this is how you’ll know me! I’ll be the girl in the bright green hat, lost in her own world of wardrobe satisfaction.

6 Comments

Filed under Fashion Backward, Noir, Pick-me-ups, School

Advance 2973: Part 1

Hello, my dears!  Here’s my sewing post, as promised.  I’ve had a dreadful weekend trying to get someone to come and fix my computer.  It decided to delete a critical system file in the wee hours of Saturday morning, and then refused to start.  I finally got it fixed yesterday, by a terribly nice repair agent and am now almost back to normal.  I’m really hoping it’s going to be okay now.

Anyway, on to the sewing!

My next project is going to be the short sleeved version of Advance 2973.  You may remember when I showed it to you ages ago. I have some fabulous bright yellow sateen that will do quite nicely for it.  I have several accent ideas that I’d like to have your opinions on.


First, I was thinking of cutting the entire dress buttons, collar, belt and all in the bright yellow sateen.  Simple, but classic and striking.

Next, I thought of cutting the collar and belt in black with black top stitching.  Maybe with black covered buttons?  Or, if I was feeling very daring, I could top stitch in yellow on the black accents

Or, cutting the collar and belt in white sateen and then top stitching in matching yellow.  This option would have either white sateen covered buttons or matching yellow.

I’m trying to push myself out of my box of restricting myself to safe color choices on my clothes.  I want to try to mix it up a little, but I want the final combo to be completely successful.  So, I’d be willing to sacrifice adventurism for the guaranteed success of the design.

So, what do you think?  Please let me know, I really am quite torn between all the ideas.

For my next post about this dress, I’m going to try a little something new.  I’d like to do a “How to decipher a pattern” post for all the newbie sewers out there.  Lise asked me if I could, since she desperately wants to learn to sew, but has no idea where to start.  It is an overwhelming project to take on, especially if you have never sewed before.  Would you be interested in something like that?

Hope you had a great weekend!

20 Comments

Filed under Fashion Backward, Sewing

Inspiration Board

I’ve got so many ideas swirling around in my head right now.  It’s getting hard to think of anything else, so I figured I’d share them with all of you.  Then, maybe I’ll be able to put them to rest until I can complete them.

First up – two vintage patterns I recently acquired that I’m terribly excited about.

The Advance 2973 dress pattern is a style that I’ve been dreaming about making.  The long lines are great for trimming the figure and the lovely billowy sleeves are amazing.  I was thinking of doing my first version in soft pink.  What color/pattern would you choose?

The McCalls 2060 playsuit pattern is just for fun.  I wasn’t looking for a playsuit, but when I saw it I couldn’t resist.  When I make it up, I’ll lengthen the shorts some, because I like my shorts a little longer.  I’m not too crazy about the appliques, so I’ll probably go plain.  Wouldn’t it be cute in red gingham with a red belt and red sandals?  :)

The center Simplicity 6825 pattern was a lovely gift from the seller on Etsy.  It’s a lovely dress.  I always adore lace sleeves and insets.

Then, I’ve been investigating accessories for the Vogue suit.  I decided while I was making it that I wanted to do a matching hat, but I was undecided about which kind.  That’s when I came across Mary Beth’s post on her class to make fedoras.  I knew I’d found my perfect hat.  I’m going to use Vogue 8175, since (as Mary Beth says) it is a better pattern.

Then, for a purse I’m still undecided.  The pattern envelope of the suit (Vogue 2885) has a terribly intriguing purse on it, (look at the lady with the red jacket) but I’d have to draft the pattern for that one myself.  I can do it, and I’ve done it before, but I may not have time to conquer that one right now.  If I can find a pattern I like as much or better, I’ll make it instead.  (Suggestions welcome!)

Next, I got these lovely fabrics for a set of headbands I’m planning on gifting to a 5-year-old friend of mine. :)  I’ve made headbands from Heather Bailey’s pattern before and they are so cute and so simple (incidentally, if you’ve never seen her blog, it’s truly worth a look).

Finally, I’m finishing up a huge crochet stole that I made over Christmas out of the softest, dark green, chenille yarn.  I just have to sew the satin blanket binding around the edges to give it stability.  I made it from this vintage pattern and it worked up beautifully.

I’ve got other little ideas nagging at me, but these are “The Big Four.”  I’ll probably be tackling the headbands first, since those are for someone else.  After that, it’s the stole.  It won’t take much to finish that, so it’s an easy feeling of accomplishment.  :)

6 Comments

Filed under Crafty, Fashion Backward, Sewing

Vogue 2885 Jacket: Part 2

Coming to you, courtesy of a once-in-a-lifetime Homework Free Weekend:

The Vogue 2885 Jacket!

(I’m sorry about the strange lighting in these photos.  It was amazingly light when I was photographing and it washed out the color in some of them. :( )

Some of the making up instructions were a little odd, but I followed everything to the letter.  I figured that I can add my own spin the next time I make the pattern.

Let’s start with the sleeves:

Both the fashion fabric and the lining have these gathers at the inside elbow.  This is a design element I’ve never seen before.  It might be practical, since when I wear it the sleeve moves with my arm very well, or it could be purely for looks.  It’s a puzzlement.

Another puzzlement that was terribly frustrating was the fact that the lining sleeves were sewn on after the rest of the jacket had been put together.  That means by hand.  I usually use my machine to ease the sleeves into the arm holes, so sewing one on by hand was a little unthinkable.  I did it, though, I’m proud to say.  It took me forever, but I did it.  I’ll say this though – I’m not going to intentionally hand sew sleeves on ever again.  ;)

Then, the back pleat:

I love the way this turned out.  It’s one of those touches that just exemplifies the 40’s look.

And, one more look at the glorious pad-stitched collar in it’s final form:

My closure of choice:

Lovely leather buttons that are so smooth and nice.  I was considering covered buttons, but while digging around in my notions box for the forms, I saw these and knew they were perfect.  I bought them a while ago when I made my brown corduroy vest (before my bloggy days) as an option for closures, but decided on something else.  So, these beauties languished in the notions box until now.  They have happily found a home.  :)

Now- on to the pink taffeta lining:

I am totally hating these buttonholes (especially on the inside).  This is one of those quirky methods I referred to above.  I have done bound buttonholes several times before – but I’ve never seen a method as hard to accomplish as this.  The fronts were quite easy, but the inside parts involved cutting a slit above where the buttonhole was on the other side.  Then, turning the raw edge created by the slit under and slip stitching, exposing the buttonhole to the inside.  It was hard to keep smooth (you can see that it puckered a little) and it was a handful while I was trying to hand sew the opening shut.  Next time, no matter what the pattern says, I’m trying Paco’s method on buttonholes that I just found today via the amazing Tany.  I like to learn as many sewing methods as I can, so that’s why I didn’t want to just discard the pattern instructions.   However, it does burn me up a little that the method wasn’t as finished looking as the rest of the jacket.  Ugh!

On to happier adventures –  the bar tacks!

This was my first experience bar tacking and I truly enjoyed it.  (Yes, that’s my sadly red thumb with the polish down there.  My hands are all dry from the cold, so they won’t exactly be in any adverts any time soon!)  There are 10 bar tacks in the lining of this jacket and I got them done in about an hour.  They look so professional!  (Sorry for that stray little thread there – my zeal for sharing got the better of my perfectionist side!)

Back view – It has a terrific silhouette, don’t you think?  Now all I have to do is invent a special occasion so I can wear it!

Overall, I’m so happy and proud of it.  If you had told me back when I was a little girl sewing stuffed bears that I would one day be able to sew this, I wouldn’t have believed you.  Goes to show how far you can come.

I wish you all a lovely day, my friends!

23 Comments

Filed under Fashion Backward, Sewing

Vogue 2885 Jacket: Part 1

I’m not finished with it yet, but here’s a little sneak peek at my Vogue 2885 jacket.

Bound Buttonholes:

Pink Taffeta for Lining:

I’m hoping the taffeta will give my jacket more body because the suiting fabric I chose is stretchy and a little flimsy.

And…Pad-stitched Collar!

Pad-stitching was completely new to me when I saw it listed in the instructions.  I had to do an extensive internet search to get enough info to figure out what I was supposed to be doing.  I hope my research will be useful to others looking for guidance.  Be reassured, pad-stitching is not as hard as it looks or sounds.

1st source: Ann’s Fashion Studio – I found this post that was a goldmine of technique and provided the one I ended up using.  The idea is to draw a grid on the interfacing of your collar or facing and use it to direct the stitching.  I believe it was originated by Roberta Carr.  (I’m gonna have to find some those DVDs that Ann mentions in her post!)  I free handed a grid on my collar according to the Vogue pattern instructions.  I needed to have tighter stitching on the collar stand and wider stitching on the wings.  That meant smaller grid boxes on the stand portion and larger on the wings.  (The yellow basting on my collar is the divide between the collar stand and the wings.)

Then, I actually had to take up the needle and thread.  One of my most terrifying moments during the process of making this outfit.

2nd source: Vintage Sewing.info – This site helped me to form a mental picture of what my stitching should look like.  The idea is to have miniscule stitches on the right side of the fabric and large, supportive V stitches on the underside.  The concentration of stitching strengthens the fabric and gives it a body it wouldn’t ordinarily have.

3rd source: Couture et Tricot – Tany’s post on pad stitching was incredibly helpful for me to see how my collar was supposed to look.  Her example is almost exactly the same shape as mine, so it gave me a much better understanding of my goal.

4th source: Sewing Pattern Review.com – I found this discussion on a message board with a helpful tip from someone named Tom P about steam pressing the collar after you finish pad stitching.  I followed the advice, and my collar stands beautifully.

I encourage you to give pad stitching a try.  It’s very worthwhile for the strength of a collar and it gives you a great sense of accomplishment to know that you mastered a technique of the vintage dressmakers and tailors.  It gives your garment a true vintage feel.  I even found it relaxing to use the needle and hand sew the pad stitching.

Coming up… finished photos of the Vogue 2885 jacket!

6 Comments

Filed under Fashion Backward, Sewing

English Joy

This has been one hard, cold, tiring day.  Really. Here in the good ole Midwest, we are suffering with below zero temperatures (-6° F but feels like -20° F with the windchill.  That’s -21/-28° C).  We were warned on the news this morning that skin exposed to the cold air for 10(!) minutes would be subject to frostbite!

Then, I’ve spent my whole day working in one of my studio classes.  (It’s an all-day class.)  Needless to say, I was beat.

So, when I checked my mailbox and found a cardboard sleeve with a sticker that said “Royal Mail” on the corner, my heart skipped ten beats.  You have to understand that for a little American girl, a package from England is like the be all and end all.

Look at this logo. Talk about good graphic design!

I have been expecting this package for some time and I was beginning to give up hope of ever seeing it.  It is so fitting that it arrived today.

My English mystery package was an impressively fat, vintage knitting and crochet “Bible” that I purchased with the last of my Christmas money.  It’s called A Stitch In Time and was authored by Jane Waller and Susan Crawford.  I am terribly happy with how big it is.  It measures 8 1/4 in. by 11 3/4 in. and it’s nearly an inch thick!

Knit on the Net has a great logo too (click photo to see it)

I found out about this little gem because of the Diary of a Vintage Girl blog.  The lovely writer is a model, and she modeled many of the sweaters (or jumpers – I just love that word) for this re-creation book.  Here’s a link to her post about it, complete with buying instructions: Knitty Gritty

The book is gorgeous, honestly and truly.  It’s worth buying for the spectacular photography alone.  I knew the minute I saw it I was going to have to learn to knit (I’m a crocheter, but somehow the joys of knitting have always eluded me).  I was right.  The patterns for vintage sweaters are so exciting, I’m just dying to get out those knitting needles and try, try again.

Aside from the new photographs of the sweaters, bathing suits, gloves, purses, belts and lingerie, A Stitch In Time also has copies of the original vintage patterns before each new, revised pattern, with the original photographs.  It’s divided into 5 sections spanning the golden years of fashion: 1920-49.  At the beginning of every new section, the authors have a short essay about the fashion of each particular year span.

Look at this cute little card that was slipped between the pages of the book:

What a day-maker!

7 Comments

Filed under Fashion Backward, Sewing