Tag Archives: Sewing

Halloween: Vintage Style

IMG_5691_editWell hi there, friends!

I come to you today with a fabulously exciting collaboration between the prolific milliner Tanith Rowan and I.  I stumbled upon Tanith’s blog in late July and became enamored with her monthly Whimsy project and stunning handmade hats. She announced in her newsletter an idea for creating a set of vintage-inspired Halloween costumes and I jumped at the chance to be a part of it. We exchanged general ideas and set about sketching in the beginning of August. In all, we both came up with 10-12 individual designs and then we narrowed down to 3 for production. And that narrowing was no easy feat. I would happily make every one of Tanith’s designs. Oh and her fashion sketching? Puts mine to shame, folks.

Tiny sidenote – as you look at these, bear in mind the fact that the garments were all sewn in a 32 square foot space. On my kitchen table. If you think you can’t sew because you don’t have room – don’t let it stop you. It can be annoying, but it’s possible and remarkable fun.

1950’s Spider
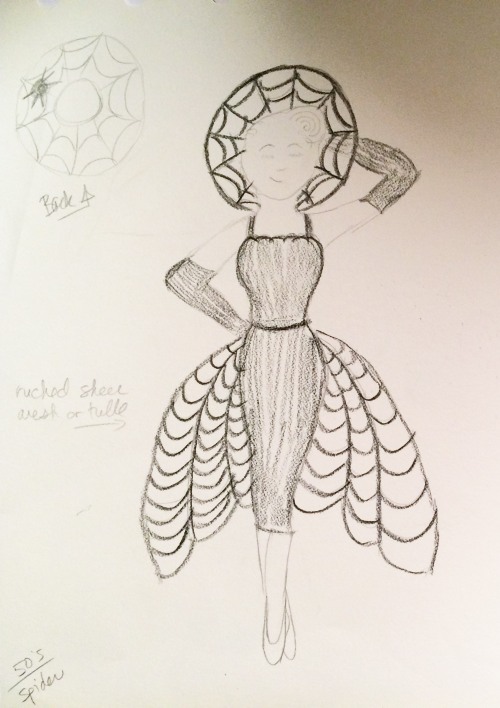
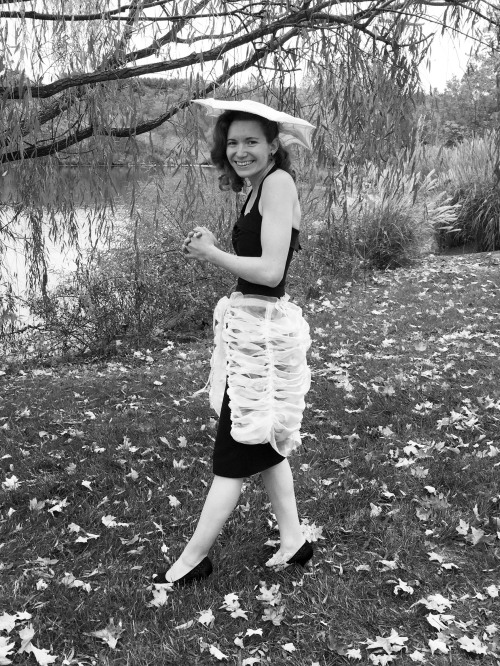
spidersketchFirst up – a 50’s sheath dress and gathered overskirt with a wide brimmed sun hat. Tanith’s take on the hat is a stroke of genius. Inside the brim, she hand cut felt spiders and hid them between the sheer layers, so they are only visible when the light shines through the brim in the right way.

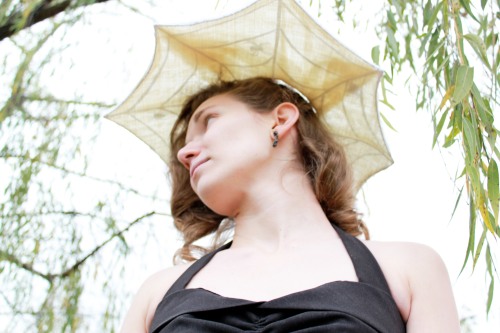
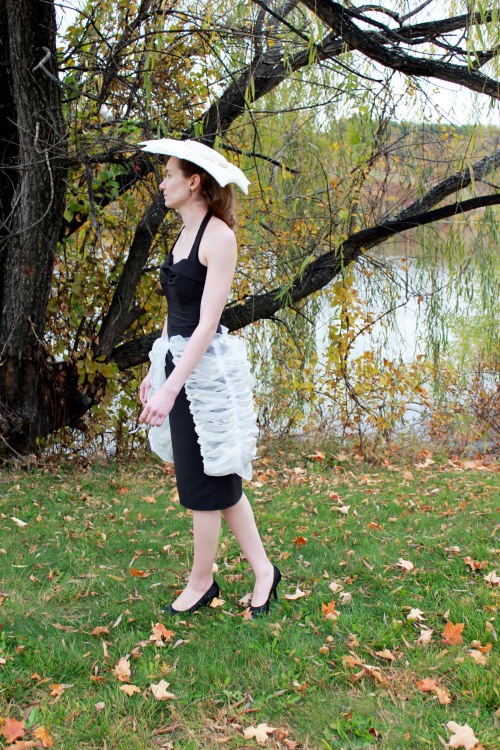
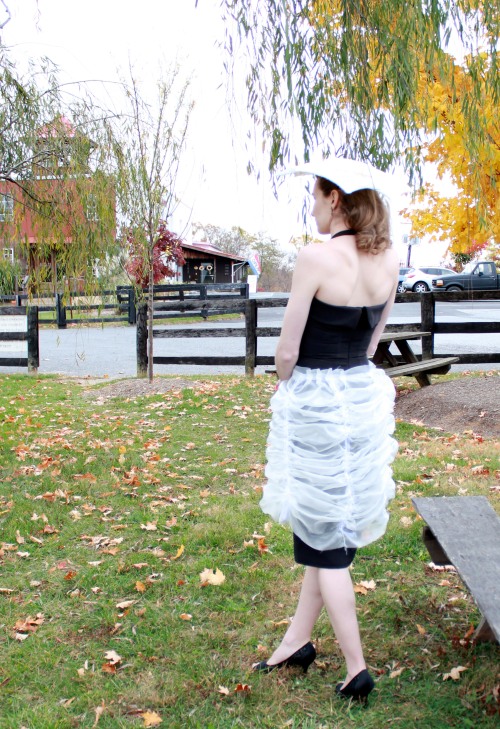
IMG_0965 IMG_0984For the dress, I used Gertie’s Tiki Dress pattern from her book and made it up in dark grey bengaline. I didn’t gather the skirt as she instructs, though.  I just used the simple pencil skirt instead. Of all the pieces for this project, I expected to have the most trouble and be the most frustrated by this one, just because of the complex nature of the construction and it being my first time using boning in a garment. It went together smoothly, to my great surprise. I even lined it! The “web” overskirt is self-drafted and made of creamy sheer. It’s loosely gathered using a technique I used last year to make an Anthropologie inspired duvet cover.
IMG_0976 IMG_09681930’s Cat

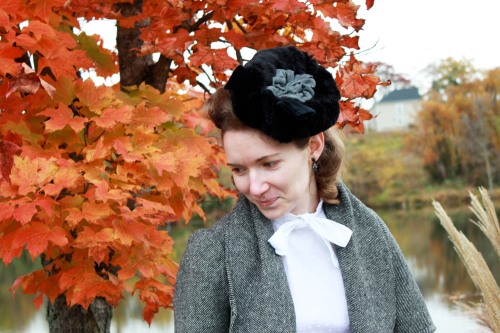
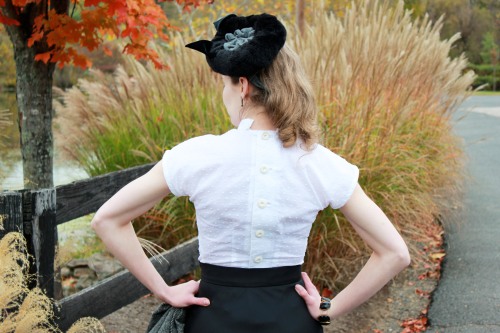
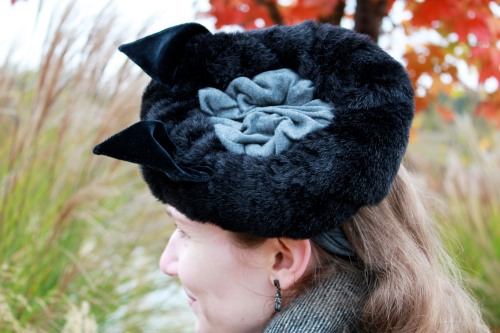
catsketchNext, a 30’s day outfit with a long skirt, bow-tied blouse and short cropped jacket. Tanith’s hat is a crown of fur with a knit fabric carefully gathered across the center and two velvet ears on the edge. By the way – a note about Tanith’s remarkable hat designs: she knows what a hat needs to help it stay on all day. For this hat, she built in a plaited bandeau that wraps around the back of your head to keep it in place. My hair mostly covers it in these photos, but trust me, it’s there.
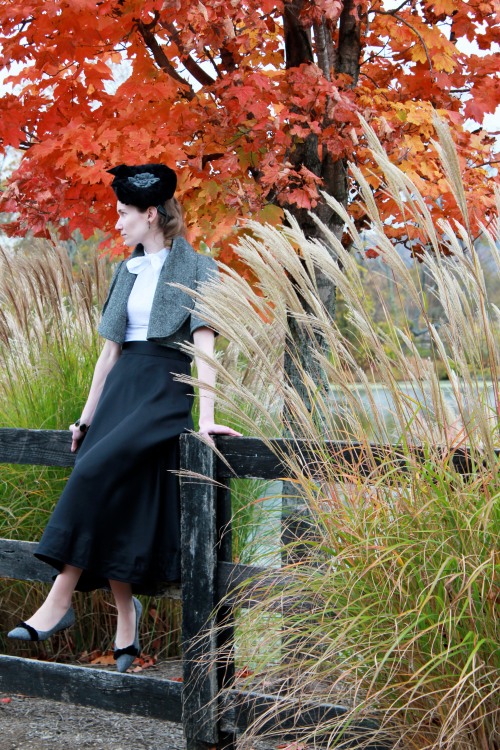
IMG_1014The skirt here is Wearing History’s 1930’s Bias Skirt pattern. I tried the print at home version and have never been so impressed with a print at home pattern. Lauren took great pains to make the matching of the pieces easy and she succeeded. If you were on the fence about trying any of her patterns, I highly recommend them (and no, she did not ask nor pay me to say it).

The blouse is Gertie’s Bow Tied Blouse (from the book above) made in cotton dotted Swiss. For some reason, this one item was the hardest and most frustrating to complete. I wish the pattern pieces from the New Book for Better Sewing were numbered or lettered somehow because I spent a whole hour convinced I did not have the pattern piece for the collar. It’s called a Collar Band in the pattern and it confused the heck out of me. The directions for sewing are a bit vague, too. If you are not an experienced sewer, they will be hard to follow. Anyway – the back is closed with 5 bound buttonholes and finished with vintage buttons. Gertie’s bound buttonhole instructions are my favorite bar none. If you are looking to attempt them, check out her tutorial in this book. In the end, I’m quite pleased with the result and will be making the blouse again.

The jacket is self-drafted with a big wide collar to give a proper backdrop for the bow on the blouse. The jacket fabric is vintage gray wool a friend gave me and it was perfect for this use. It’s been waiting on my fabric shelf for just such a project.

Of the three outfits, this is my favorite. And as Tanith said in her post, I love them all!
IMG_1027 IMG_1026 IMG_10421940’s Bat

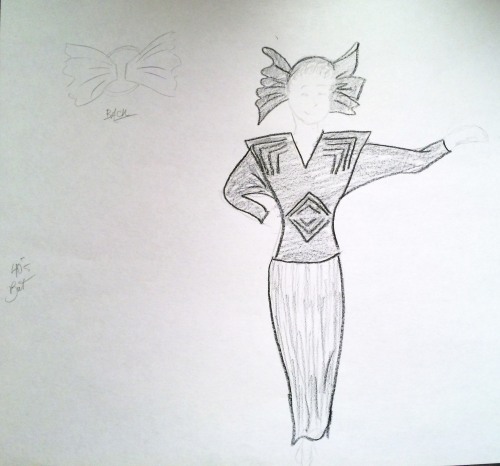
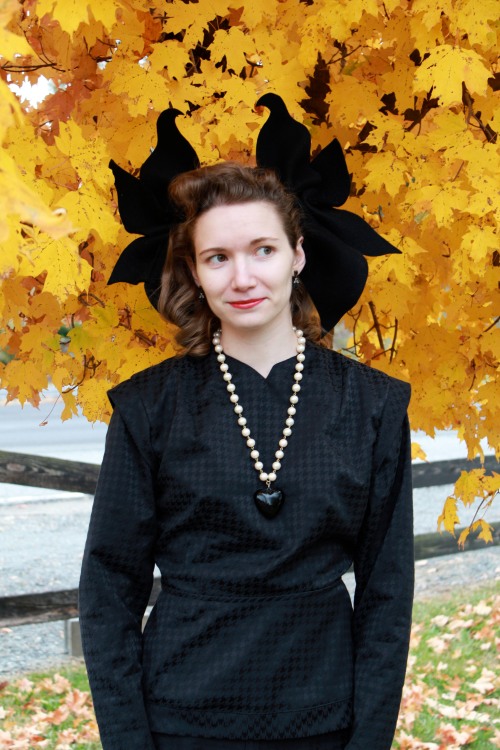
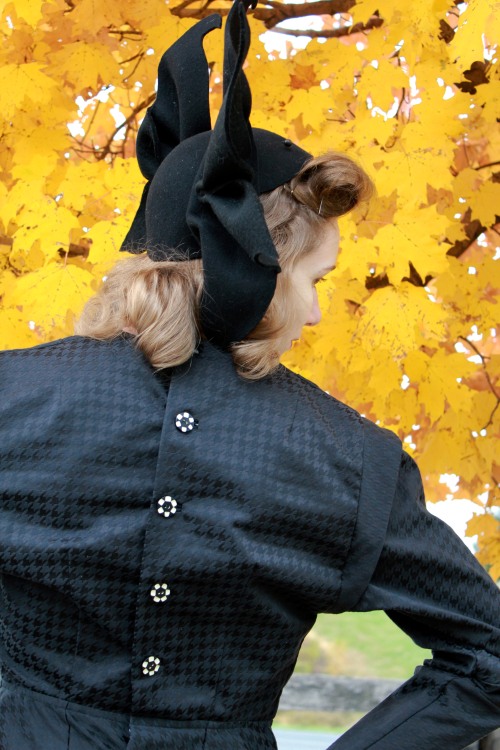
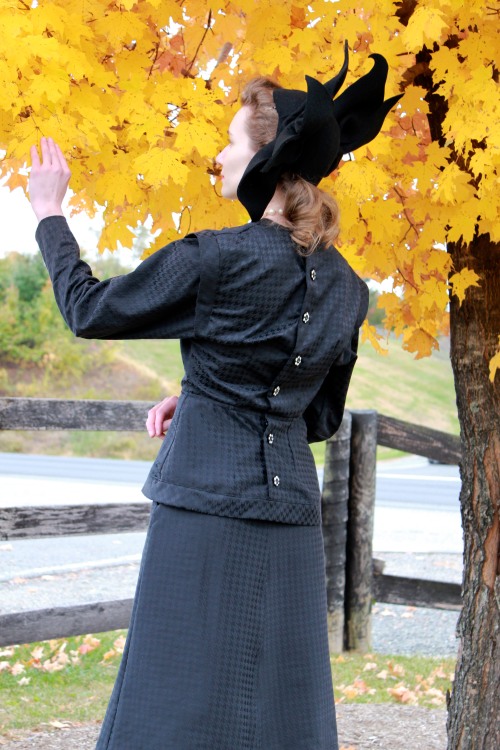
batsketchThe final outfit is a 40’s batwing suit made of houndstooth brocade. Tanith’s beautiful rendition of this hat blew me away from the moment I unpacked it. It’s another example of her thoughtful practical-ness, too. Inside, there are two elastic loops you bobby-pin to secure it.
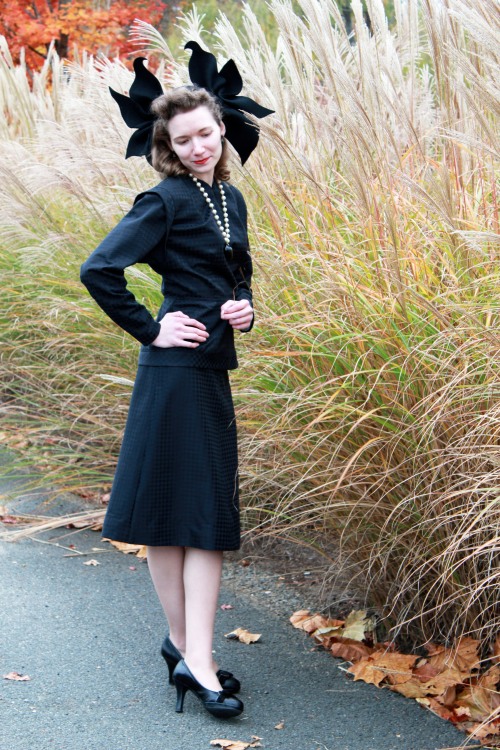
IMG_1090I initially intended to add directional quilting as you can see from the sketch, but when I found the houndstooth fabric, the quilting seemed like it would interfere. This design also has a back closure and no, the back closure theme was not intentional. The lines of both designs just seemed to fit with what we were going for. The pattern used for this outfit is Simplicity 1706 from the 40s. The buttons are another set of vintage beauties waiting for the right project to come along.
IMG_1059 IMG_1054 IMG_1046I am so honored to have worked with Tanith on this endeavor. She is a lovely person full of ingenuity, talent and brilliance. Make sure you go check out her post on this project over at her blog and while you’re at it, look at her Whimsy project, too!

Also, I’d like to extend my sincere gratitude to my dear friend Mrs. T who kindly dropped everything to take off on a photoshoot adventure with me at a moment’s notice. She snapped all the photos here and did a truly wonderful job. I love you, dearie.

5 Comments

Filed under Sewing

Kitty Clutch Tutorial

My dear friend Kate of Scathingly Brilliant is vacationing in Disneyland this week and in place of her regularly scheduled postings, she has a week full of DIYs. Today’s tutorial was created by yours truly. Hop over and take a peek! :D

4/1/14 Edit:

I’m adding the files for download here for you too:

Pattern

Tutorial

2 Comments

Filed under How to, Sewing

CSSA: Skirt Finished!

Well, the skirt is finished! This week, I hemmed up the bottom using the machine rolled hem method from Casey’s Hem Post. Before I settled on this method, I sewed that famed horsehair braid on the hem. It really IS magic stuff. It gave the hem a life of its own, pushing it out in lovely curves all around. But alas, it didn’t seem right for the lightweight fabric I’m using, so I removed it and went for the machine rolled hem instead. Behold the beautifulness of a completely hemmed skirt!

Have a look at the skirt laid flat. It’s an honest to goodness circle!

Up next, those scalloped suspenders – at the finish of which I promise I’ll model the ensemble!


2 Comments

Filed under Sewing

CSSA: Zipper and Waistband

Well, I’m making progress with my circle skirt! All caught up with the instructions and waiting to learn how to use the horsehair braid to hem the bottom. This week, I sewed in the zipper (vintage metal – my favorite!) decided on my waistband shape and drafted, interfaced and sewed it on.

Oh – you will notice that I’m not using the fabric from my supplies post. I discovered that the lovely plaid I was going to use for this wasn’t quite enough. I only had 3 1/2 yards and needed 4. So, I raided my fabric stash and came up with just the right amount of this cherry red cotton pique. Happy ending!

[Please excuse the bad lighting in that photo. It’s been raining here for more than a week and picture taking is difficult!]

Of course, as soon as I finished the waistband, I tried it on. Goodness gracious, I’ve never been so thrilled to wear a skirt in my life. The fabric flows from the waist in such a beautiful way, it’s like magic. And the swirling! I twirled and swirled in this for a good ten minutes before I was content. Every girl needs one of these skirts. It comes under the heading of Mandatory Morale Booster.I think I miscalculated in my measurements because I don’t have the overlap at the back of the waistband for the closure. It’ll be all right though, I’ll just sew the hook and eyes close to the edge and make it line up.

A little touch of gingham ribbon on the inside of the waistband here.

Up next:

Scalloped suspenders! I’m working on the measurements for these now. These will be checked and double checked for perfection! I’m leaning towards using big covered buttons to attach them. What do you think – is there something better?

6 Comments

Filed under Sewing

Scallop Waist Skirt

I just finished making up Chie’s Scallop Waist Skirt from Grosgrain’s glorious Free Pattern Month. It’s a half circle skirt, perfect for dancing because it swings and twirls like a dream. The pattern is very straightforward and easy to work with, if you follow the instructions and actually listen to Chie’s directions. I neglected to do this because I got too cocky for my own good and I ended up making a right mess of my first attempt. But in the end, success prevailed and my new skirt is finished!

What I did wrong:

1. For my first try, I allowed Adobe Reader to print the pattern “Fit to page,” which shrunk everything…A LOT. This is why Chie so brilliantly includes a simple square in the pattern marked “5 inch Square” – so you can measure it, before you piece the pattern together, and be sure everything is the right size. Don’t neglect this!

2. For my second try, I believe I cut the waistband a size or two larger than the skirt. It seemed like it would be fine and I could just sew it to the skirt and then cut off the extra. Trouble with that idea is, the scallops are perfectly measured to match up at the zipper. So, when I lopped off one end of the waistband, it threw off the matching at the back. Lesson learned: check and double check everything.

3. I wrecked the first zipper when I tried to put it in the skirt. That’s why the zipper is white. I had a tan one and it matched great, but after I wrecked it, I wanted to force myself to put a zipper in correctly (just to prove I can do it!). Instead of running to Joann’s at 7pm, I utilized a white zipper from my stash. It doesn’t match, no. But I wasn’t about to be beat by an invisible zipper.

What I did right:

1. I lengthened the skirt about 2″ because I’m something of a tall person. I’ll add another 2″ when I make the skirt again, because this length is as short as I like to go.

2. The fabric I chose was a stroke of luck – it’s a lightweight suiting fabric with a lovely drape. Make sure you choose a fabric light enough to do justice to the swingy-ness of this skirt when you make it.

Gushing:

I love the way the scallops contrast against the blouse! And of course the incredible genius of the half circle skirt is enough to take any sewing fanatic’s breath away. I think I’ll make this in navy blue and bright red next. And then maybe hunter green!

Outfit details:

Sweater: Old Navy

Skirt: Made by me from Chie’s Pattern

Shoes: Melissa + Alexandre Herchcovitch Troupe Wedges from ASOS –> These are my first Melissa shoes and my new favorites. So comfortable, so cute and they smell like bubble gum!

15 Comments

Filed under Sewing

Posh Frock Friday on Sunday

It’s been a hectic week, so I’m Posh Frock Friday-ing here on Sunday, instead. My outfit is inspired by 40s war-working women. You may think I’ve gone all exotic on you, but actually the turban is a stylish hiding place for my pincurls.

Dress – handmade by me! You may remember this post asking for guidance on fabric choices?

Turban – scarf from Walmart. Tying instructions here.

Shoes – Newport News. These are my Carmen Miranda shoes – 4 inch heels!

6 Comments

Filed under Posh Frock Friday

Advance 2973: Part 2 – Prepare the Pattern

How to Sew: Part 1

Before I begin, I’d like to extend my sincere thanks to everyone who chimed in with opinions and suggestions for my new yellow dress.  The discussion was quite lively, with tons of amazing ideas tossed around.  In the end, I’m going for the plain yellow dress with no other colors sewn on.  Then, when I wear it I can accessorize with red, blue, green, black, white, brown, purple and even orange if I wanted to.  In the long run, it’s probably the best way to get the most wear out of the dress.

Today I’m going to share about how I begin working with a vintage pattern.  In my case, Advance 2973 from the 1940s.  Vintage patterns are quite fragile, so instead of using the original pattern pieces that come in the envelope to pin to the fabric, I like to trace them all out onto brand new tracing paper before I begin.  I only make a working copy of the pattern when working with vintage.  For the brand new patterns you can buy in the fabric store, I cut right into them and use them as is.

First, you’ll need to gather your supplies.

– 1 roll of regular tracing paper (I got mine from here, but I’ve seen it in my local Hobby Lobby in the drafting section) Wax paper, packing paper and butcher paper will all work fine, too.

-1 reliable pencil (I like mechanical)

-1 fine tipped permanent pen (I used a Sharpie pen)

-1 regular clean iron (I say clean because you don’t want any yucky burned stuff coming off onto the pattern when you iron it.)

-1 pair of paper scissors (see note below*)

-1 vintage pattern

an assortment of household items to use as weights while tracing (candles and small cans of food would be good, but you can use whatever you have – you just don’t want it to be too bulky that you can’t get your arms around it to trace)

-1 large plastic zip-top bag

{Step 1}


Take all the pieces from the envelope very carefully.  The paper is fragile and tears easily.  Unfold each piece, one at a time and smooth them out with your hand. (Make sure you don’t have any lotion on your hands.) Make a little pile of your smoothed pieces.

{Step 2}


Turn on your iron to its lowest setting – the coolest it can be while still being on.  On my iron, that is the “synthetic” setting.

{Step 3}

When the iron is ready, take your first smoothed pattern piece and gently but quickly glide the iron over it to smooth out the wrinkles.  [Disclaimer: I’m sure some sewers are going to be horrified at the idea of ironing vintage pattern pieces to smooth them out, since heat is so well know to be a killer for vintage items.  I can’t come up with any other way to make the pattern usable.  If you have a better way, please share it.  I’m always open to suggestions.] Continue using the iron to smooth all the rest of the pieces, taking care not to catch the iron on any marking perforations in the paper.

{Step 4}


Lay out all your ironed pieces and compare them to the pattern instructions to see if they are all present and accounted for.  This is very important, because vintage patterns often have pieces missing.  If you find your pattern is missing a piece, it’s not the end of the world.  Sewing forums or blogs like Sew Retro are great places for connecting with other sewers who may have the same pattern as you and would be willing to trace your missing piece and send it to you.

{Step 5}

Get acquainted with your pattern pieces.  On my pattern, all the information is marked with perforations made in the paper.  The letter of the pattern, signifying which piece it is, is marked with a dotted letter.  Small circles and notches are used as matching points, so you know how to match up the different pieces.  Most of the early patterns (1930s-1960s, I think) were marked with perforations.  The idea of printing on the patterns didn’t take hold until the mid 60’s, I believe.

{Step 6}


Time to trace.  Roll out your tracing paper on a large flat surface.  You’ll want a good amount of room, but this can be done in a smaller area. Lay your pattern pieces out on the paper, rotating them to make as many fit as possible and set your weights on top of them. When laying out the pieces, make sure you notice where the notches are – these look like little triangles cut into the side of the paper. When you have the pieces arranged the way you want, start tracing around them with your pencil.  Trace the outline, the inside of the perforations and draw out your notches.  Make sure you look over the pattern carefully to be sure you have found all the marking perforations.  It’s easy to miss them sometimes.  Many patterns, like my Advance, have all the perforations and notches labeled on the instruction sheet.  Compare your tracing to that to double check.  Trace each piece individually out onto the paper.

{Step 7}


Before we continue with the new traced pieces, let’s preserve the vintage pieces and keep them safe.  Here’s where you’ll need your zip-top bag. Fold each pattern piece back up into a manageable size. Gather the folded pieces, together with the pattern envelope and slip them into your plastic bag.  At the end of this project, when you are done with the instructions, they will also be stored in this bag.  The bag will help to keep the pieces from being lost, and also provide some protection for the yellowing paper.

{Step 8}


Now that you have all the pieces traced in pencil, get out your fine tipped permanent pen and go over all the perforation markings and the pattern letter.  These are the most important pieces of information on the pattern, and you don’t want them to get smudged or rubbed out. It’s not necessary to mark over the outline in permanent pen, since it is only a cutting line.

{Step 9}


Break out those paper scissors now and cut the new traced pieces out of the background.

{Step 10}


One last step: look at the cutting layouts on the pattern instruction sheet.  On a vintage pattern, this is the only way you are going to be able to figure out how many of each piece to cut.  On modern patterns, this information will already be printed on the pattern piece.  You’re going to see rectangle boxes with all the pattern pieces laid out on them.  The rectangle represents a yardage of fabric as you would buy it in the fabric store.  It is a huge piece that has been folded in half to create this slender rectangle.  On the instruction sheet, one long side of the fabric is marked with the word FOLD.  On the other, you’ll see the word SELVAGES.  The selvages are factory finished edges of the fabric.  On my cutting instructions you can see that we have 5 pattern pieces that need to be cut on the fold.  The fold is marked on each piece with two large dots in a vertical line.  Usually, when a pattern piece is cut on the fold, you only need one.  Pieces cut on the fold are mostly back and collar pieces, since they are symmetrical.  From the cutting instructions, we can ascertain that for Advance 2973, we will need:

2 of A

1 of B (on fold)

1 of C (on fold)

1 of D (on fold)

2 of E

2 of F

1 of G (on fold)

2 of H

4 of J

1 of K (on fold)

2 of L

2 of N

Go back to each of your traced pattern pieces now and mark the number of fabric pieces you ‘ll need for each and whether or not it is cut on the fold.  This will help you immensely when you are ready to cut the fabric.

Armed with your new set of pattern pieces, you are now ready to begin your sewing endeavor!  Up next, Outfitting Your Sewing Kit.

As always, if you have a comment, suggestion,  see something I said that is wrong, or have trouble understanding a step, leave me a note and tell me about it.  I’m a big believer in feedback!

*In the sewing world, there are 2 kinds of scissors – fabric and paper.  Each is kept separate from the other and used for their specific purpose only. They aren’t special scissors you can buy and before they are used they are exactly the same.  The difference comes with use. Paper dulls the blades faster than fabric, so you never want to cut paper with your fabric scissors.

Leave a comment

Filed under How to Sew, Sewing

Advance 2973: Part 1

Hello, my dears!  Here’s my sewing post, as promised.  I’ve had a dreadful weekend trying to get someone to come and fix my computer.  It decided to delete a critical system file in the wee hours of Saturday morning, and then refused to start.  I finally got it fixed yesterday, by a terribly nice repair agent and am now almost back to normal.  I’m really hoping it’s going to be okay now.

Anyway, on to the sewing!

My next project is going to be the short sleeved version of Advance 2973.  You may remember when I showed it to you ages ago. I have some fabulous bright yellow sateen that will do quite nicely for it.  I have several accent ideas that I’d like to have your opinions on.


First, I was thinking of cutting the entire dress buttons, collar, belt and all in the bright yellow sateen.  Simple, but classic and striking.

Next, I thought of cutting the collar and belt in black with black top stitching.  Maybe with black covered buttons?  Or, if I was feeling very daring, I could top stitch in yellow on the black accents

Or, cutting the collar and belt in white sateen and then top stitching in matching yellow.  This option would have either white sateen covered buttons or matching yellow.

I’m trying to push myself out of my box of restricting myself to safe color choices on my clothes.  I want to try to mix it up a little, but I want the final combo to be completely successful.  So, I’d be willing to sacrifice adventurism for the guaranteed success of the design.

So, what do you think?  Please let me know, I really am quite torn between all the ideas.

For my next post about this dress, I’m going to try a little something new.  I’d like to do a “How to decipher a pattern” post for all the newbie sewers out there.  Lise asked me if I could, since she desperately wants to learn to sew, but has no idea where to start.  It is an overwhelming project to take on, especially if you have never sewed before.  Would you be interested in something like that?

Hope you had a great weekend!

20 Comments

Filed under Fashion Backward, Sewing

Headbands and Sachet Set

I got my little headbands all finished!  It was touch and go there for a while.  I though maybe I wouldn’t finish them in time for the event where I was going to see my 5-year-old friend.  It all worked out, though.  :)  Have a look at the finished product.

I fashioned a “headband sachet” (a play on handkerchief sachet) out of the pink bandanna fabric and the remainder of the pink taffeta from the Vogue jacket.  I have a handkerchief sachet that is this same size and it served as my model.  My version has satin ribbon ties and an iron on embroidery initial.  I also used fusible fleece on the wrong side of the bandanna fabric to give the sachet more body.  It worked out well and has a great aesthetic feel when you hold it.

I treated the edges of the ribbon with Fray Check, because there is absolutely nothing worse than frayed edges on ribbon.  It’s one of my sewing pet peeves.  I just think it ruins the whole look of the piece.  I feel that if, as a sewer, you’re going to go to the trouble of making something lovely, it should be as professional and finished looking as possible.

The inside of the sachet – It has two pockets for keeping headbands and other treasures.  I’ve heard that some ladies used their sachets as hiding places for love letters and other sentimental items.  I think that’s a lovely idea.

If you’d like to make headbands of your own, have a look at Heather Bailey’s instructions.

Happy Sunday, my dears!

5 Comments

Filed under Crafty, Sewing

Inspiration Board

I’ve got so many ideas swirling around in my head right now.  It’s getting hard to think of anything else, so I figured I’d share them with all of you.  Then, maybe I’ll be able to put them to rest until I can complete them.

First up – two vintage patterns I recently acquired that I’m terribly excited about.

The Advance 2973 dress pattern is a style that I’ve been dreaming about making.  The long lines are great for trimming the figure and the lovely billowy sleeves are amazing.  I was thinking of doing my first version in soft pink.  What color/pattern would you choose?

The McCalls 2060 playsuit pattern is just for fun.  I wasn’t looking for a playsuit, but when I saw it I couldn’t resist.  When I make it up, I’ll lengthen the shorts some, because I like my shorts a little longer.  I’m not too crazy about the appliques, so I’ll probably go plain.  Wouldn’t it be cute in red gingham with a red belt and red sandals?  :)

The center Simplicity 6825 pattern was a lovely gift from the seller on Etsy.  It’s a lovely dress.  I always adore lace sleeves and insets.

Then, I’ve been investigating accessories for the Vogue suit.  I decided while I was making it that I wanted to do a matching hat, but I was undecided about which kind.  That’s when I came across Mary Beth’s post on her class to make fedoras.  I knew I’d found my perfect hat.  I’m going to use Vogue 8175, since (as Mary Beth says) it is a better pattern.

Then, for a purse I’m still undecided.  The pattern envelope of the suit (Vogue 2885) has a terribly intriguing purse on it, (look at the lady with the red jacket) but I’d have to draft the pattern for that one myself.  I can do it, and I’ve done it before, but I may not have time to conquer that one right now.  If I can find a pattern I like as much or better, I’ll make it instead.  (Suggestions welcome!)

Next, I got these lovely fabrics for a set of headbands I’m planning on gifting to a 5-year-old friend of mine. :)  I’ve made headbands from Heather Bailey’s pattern before and they are so cute and so simple (incidentally, if you’ve never seen her blog, it’s truly worth a look).

Finally, I’m finishing up a huge crochet stole that I made over Christmas out of the softest, dark green, chenille yarn.  I just have to sew the satin blanket binding around the edges to give it stability.  I made it from this vintage pattern and it worked up beautifully.

I’ve got other little ideas nagging at me, but these are “The Big Four.”  I’ll probably be tackling the headbands first, since those are for someone else.  After that, it’s the stole.  It won’t take much to finish that, so it’s an easy feeling of accomplishment.  :)

6 Comments

Filed under Crafty, Fashion Backward, Sewing